How to make a Zelda style dungeon for TTRPGs
Feb 13, 2021
Dungeons! … can become a boring railroad, but they don’t have to. Personally whenever I think of dungeons I don’t actually think of TTRPGs, I think of The Legend of Zelda. Stone Tower, Water Temple, Fortress of Winds, Tower of the Gods… the list goes on. Is there a secret to a Zelda dungeon? Can we reverse engineer a Zelda style dungeon into our TTRPGs?
Cover photo by Jordan Grider
This article builds upon the research from the excellent Boss Keys series by Mark Brown. In this series Mark studied what makes a Zelda dungeon a Zelda Dungeon, distilling it down to a very interesting graph language. Those graphs are the heart of the dungeon we will make together in this article. I fully recommend watching the series even if the graph system is not fully developed until episode 7; or at the very least check Episode 7: The Minish Cap.
I will break down the process in steps. We’ll start with a randomly generated dungeon and end with a custom edit of the same with an understanding of how the characters will move trough it. And we’ll make a lot of graphing in between. You can also read my advice on Running the dungeon.
A Random Dungeon
If we are making a new dungeon why are we starting with a random one? Well, starting from scratch is very hard and, trying to justify the layout, that is, coming up with reasons why this dungeon is the way it is, can be very fulfilling. Just looking at a map will spark ideas.
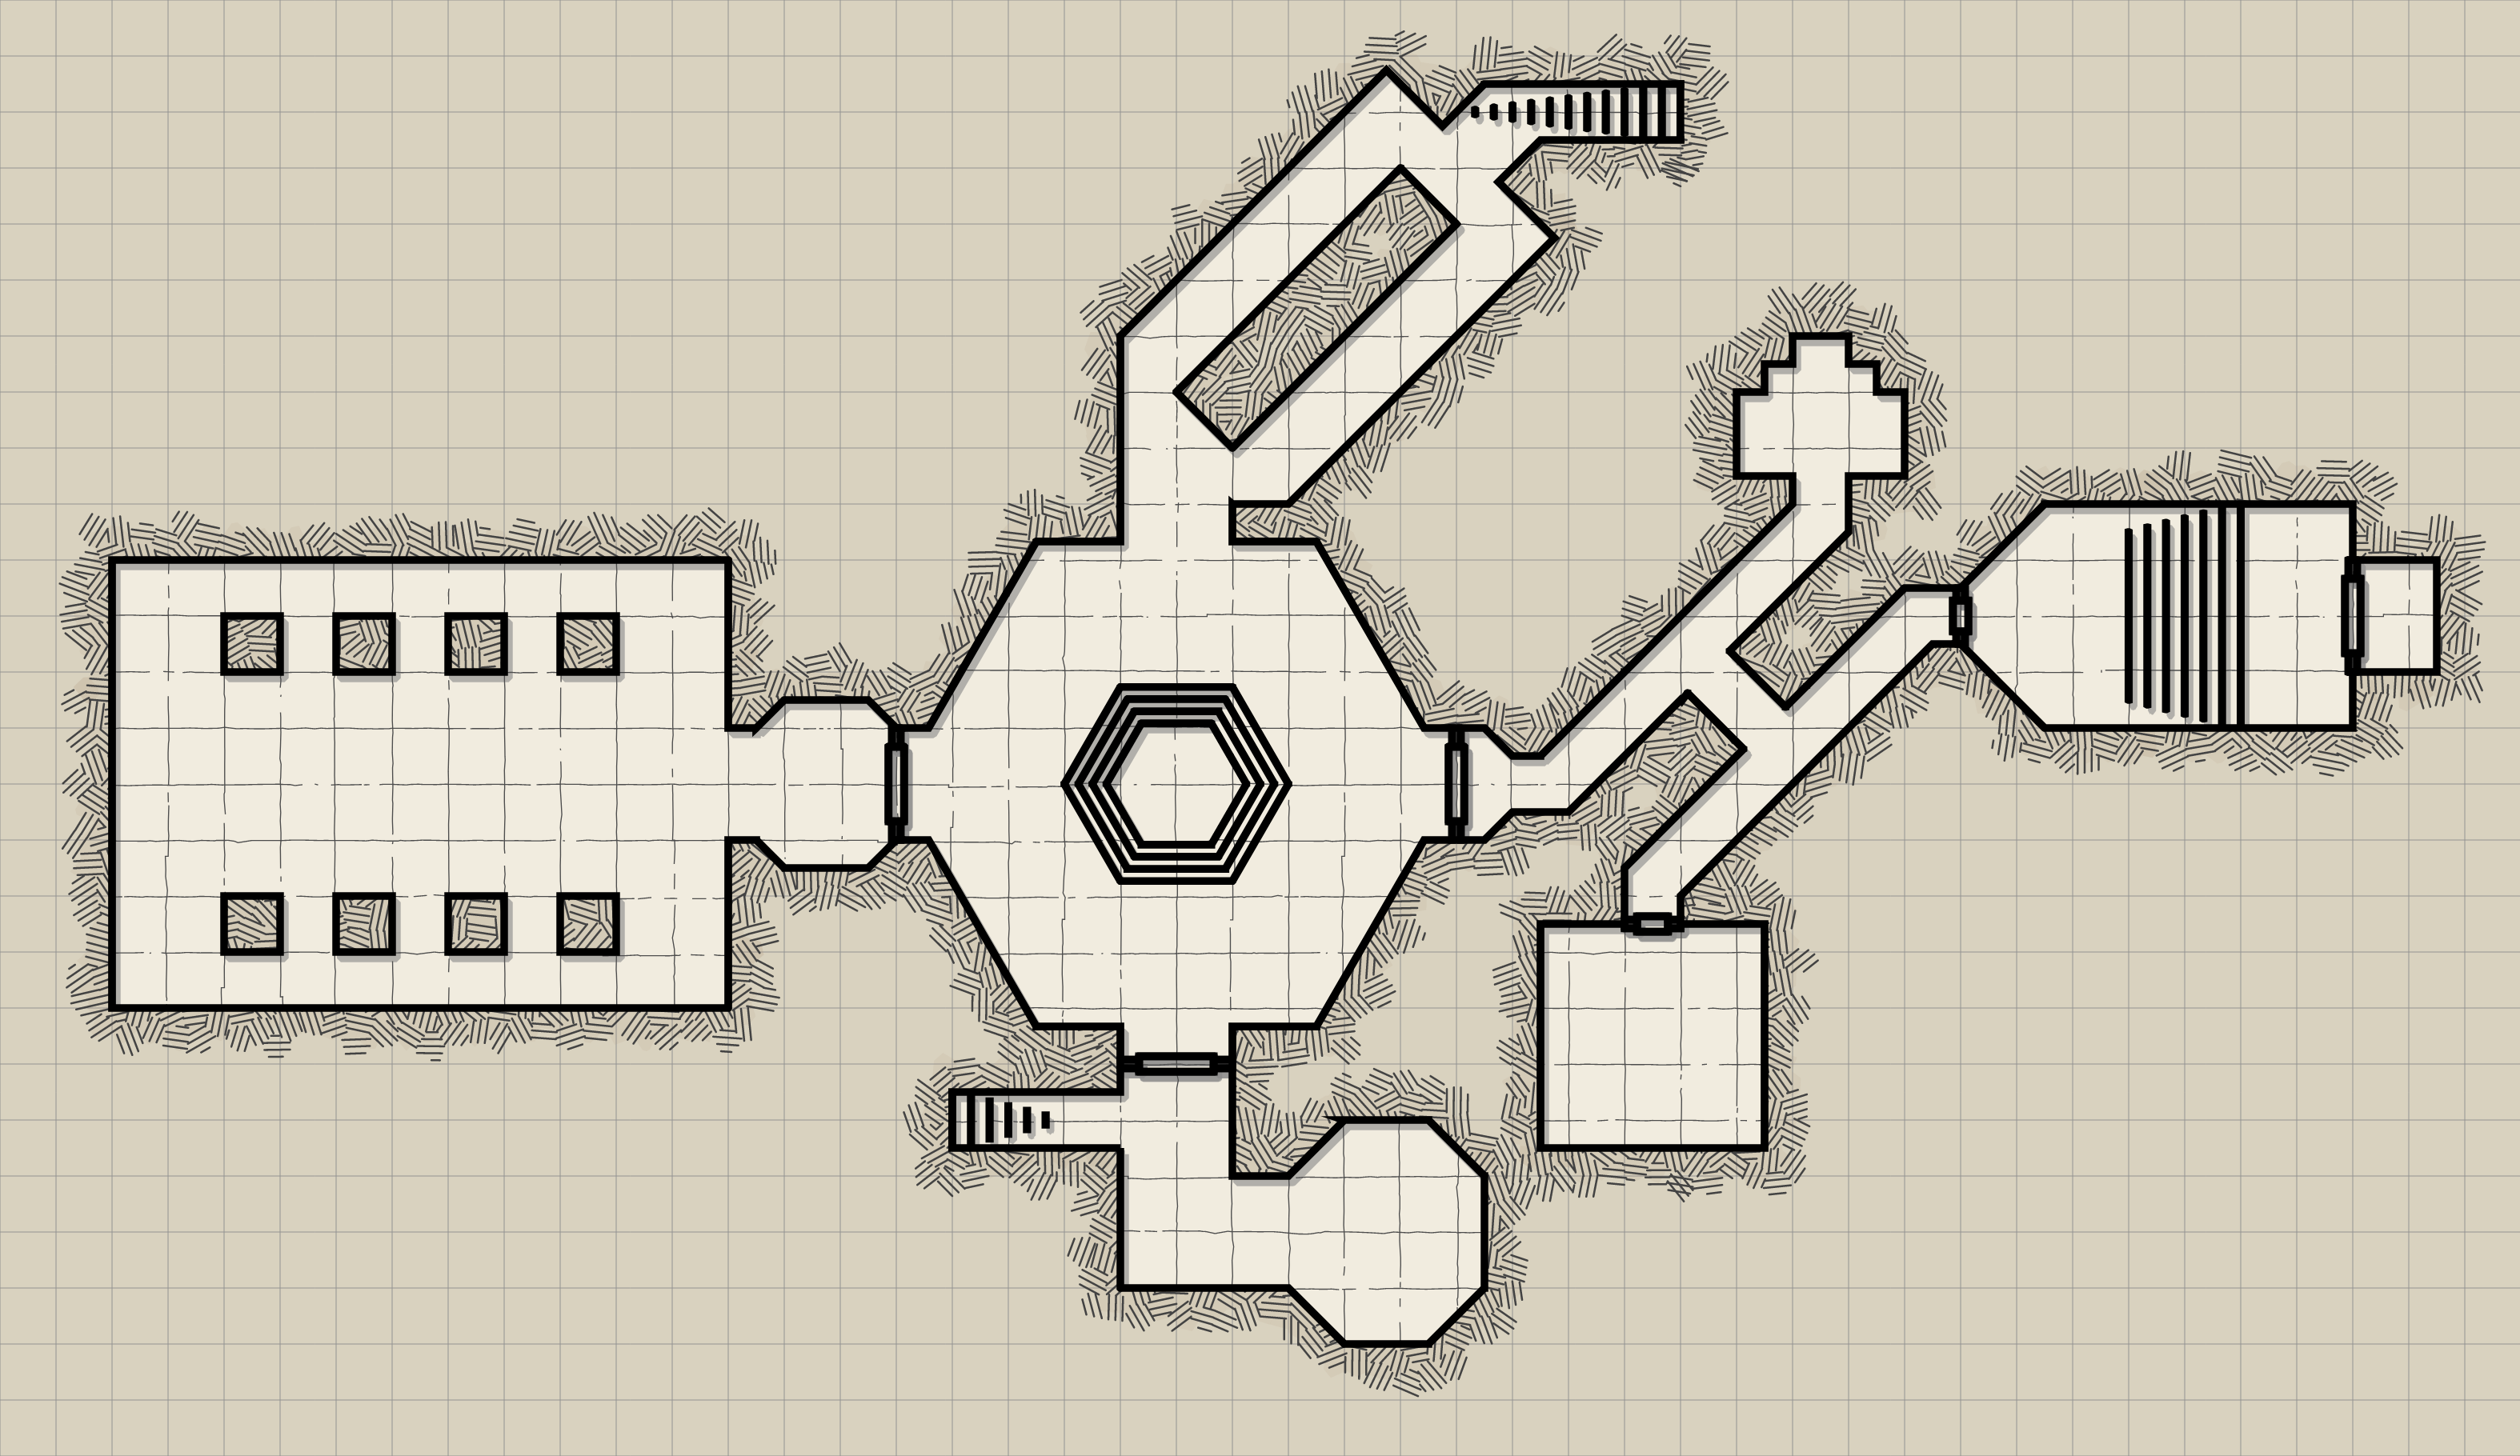
For this I use DunGen: it has several tile sets, you can download maps indifferent resolutions and it has a lot options including some interesting room shapes.
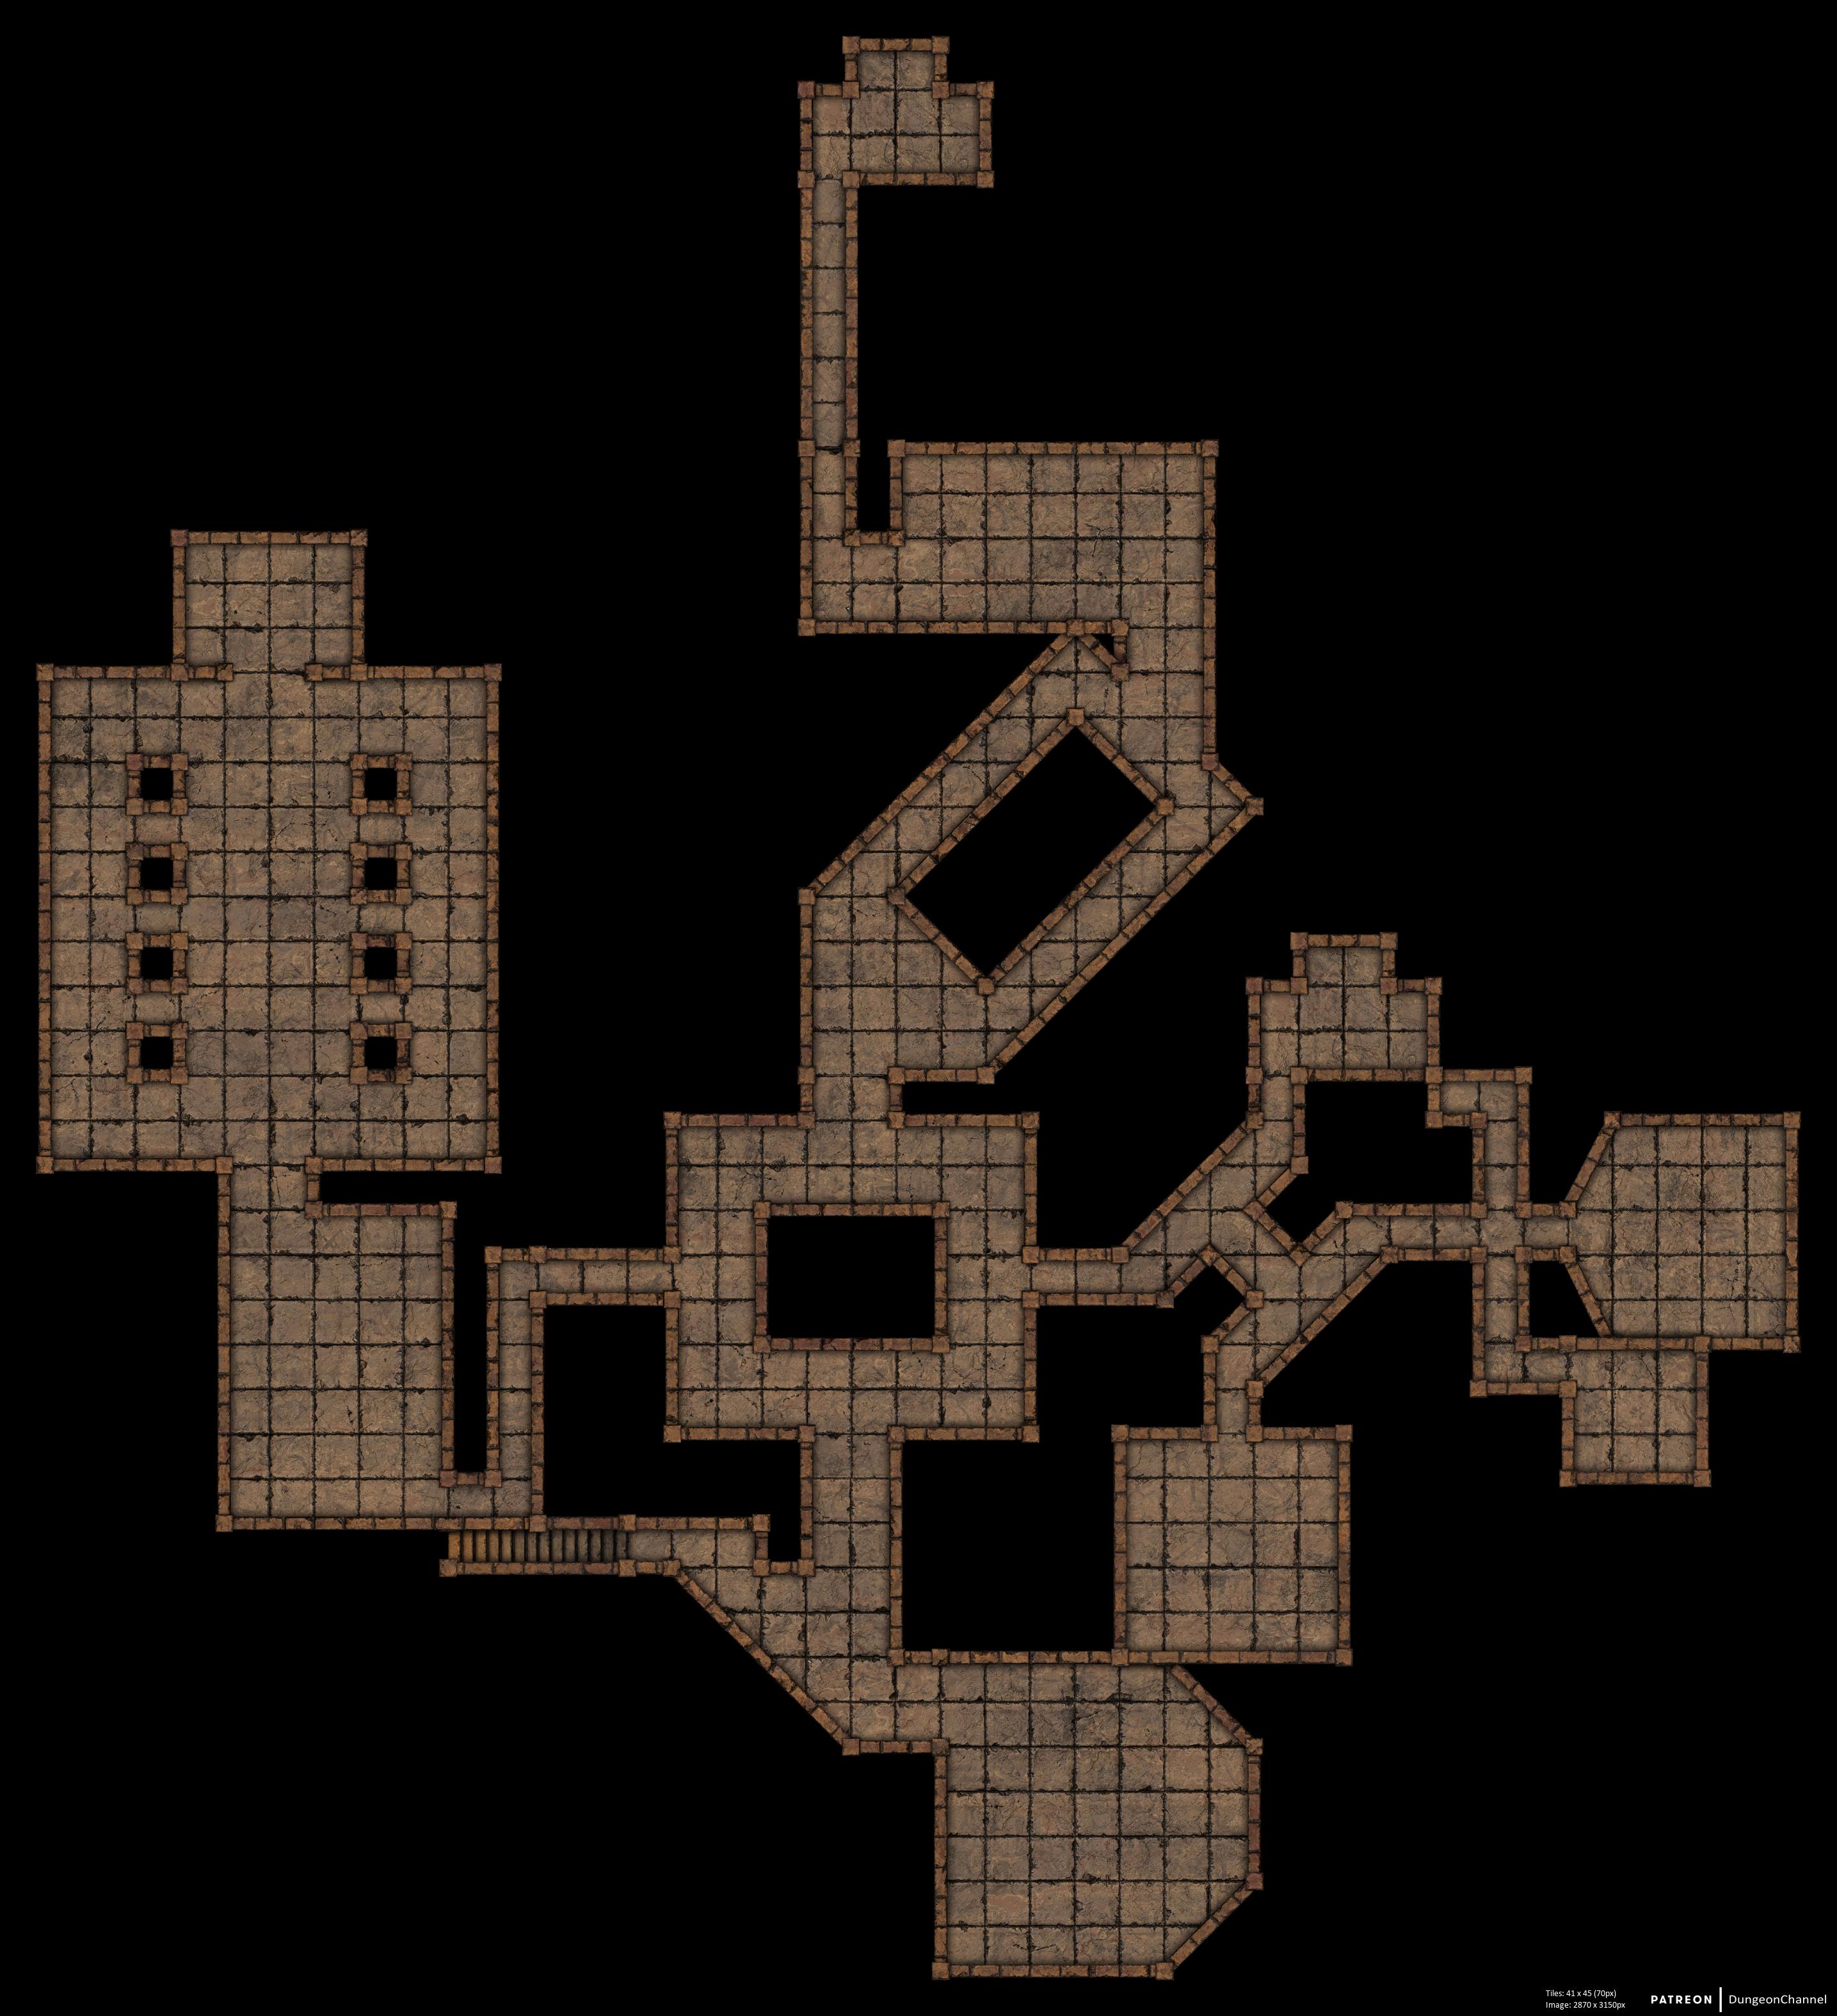 You can generate this dungeon using the seed
 42250252 at DunGen
Some recommendations to generate a dungeon:
- Avoid long corridors, they aren’t interesting and take a lot of map space.
- It’s better to go small than to go big. Four or five rooms are probably enough to fill a session; and you can always add another level if needed.
- Keep in mind not every room will make it to the final map. So, if there’s a zone that’s not interesting but the rest is, remove it during the edits.
All of these things can be fixed later, but it’s easier if you start with something interesting.
Decide on important rooms
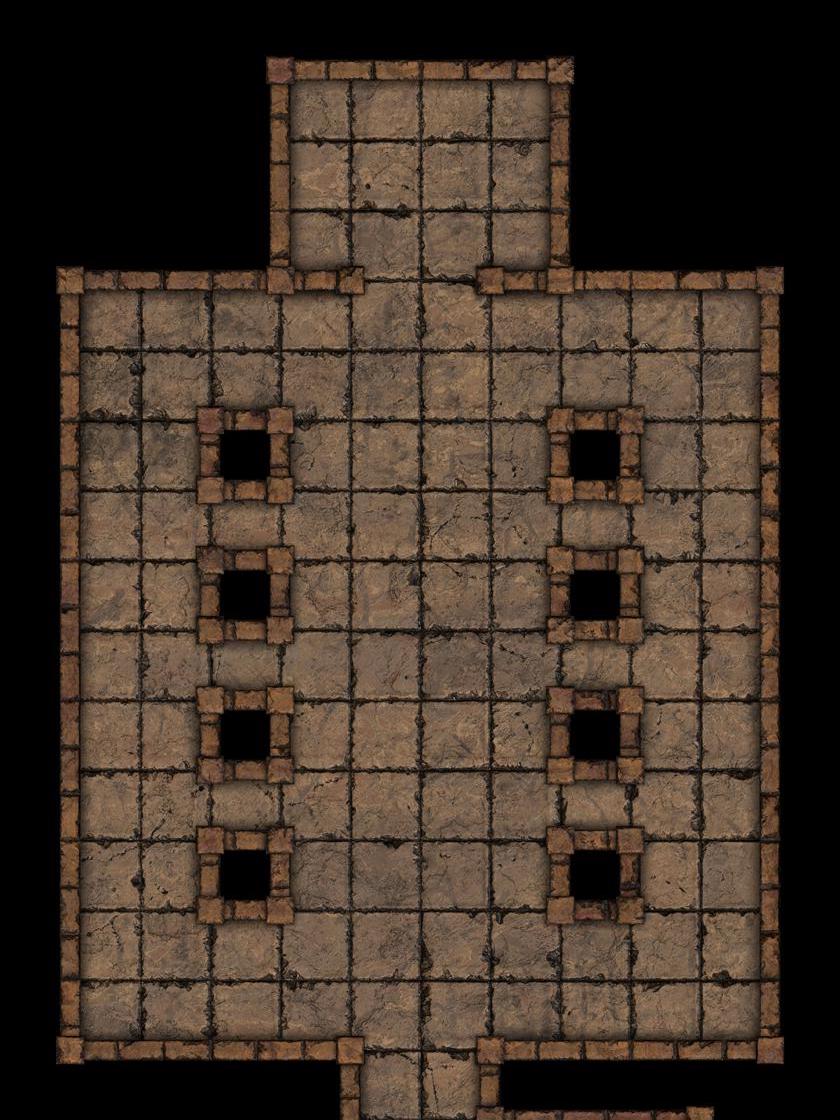
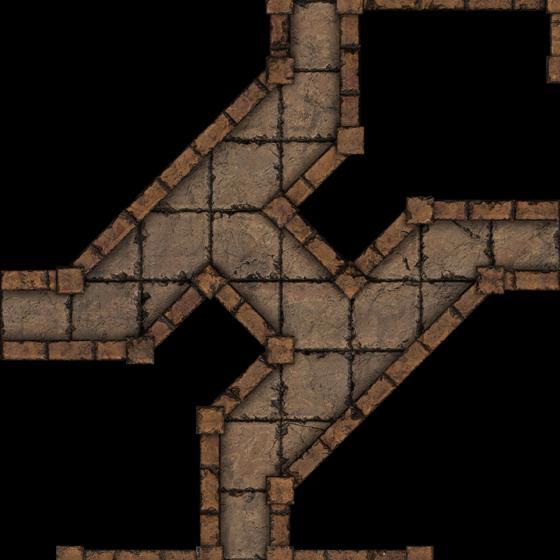
- Large room on the left, boss room?
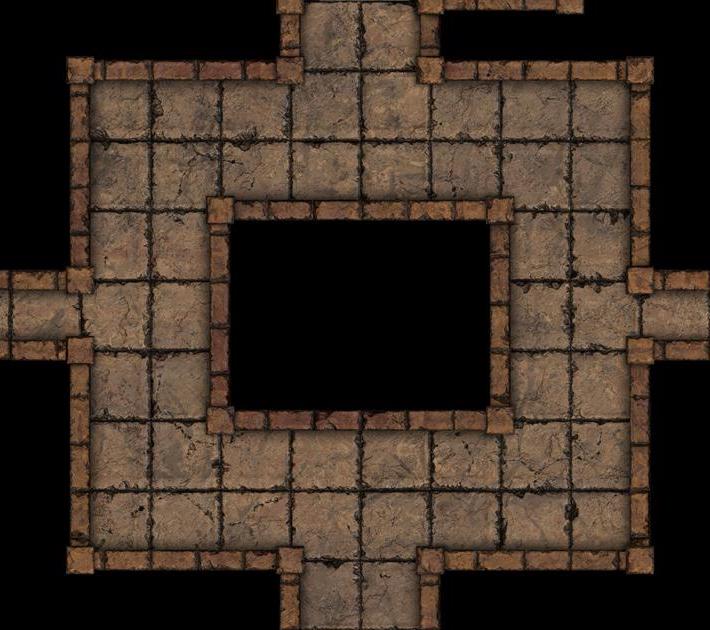
- Room on the centre, bifurcations are an easy way to have backtracking
- Slanted room is saying “trap”
- Room on the right, could hold a
treasureor akey
I already know some of these rooms are not making it in the same form to the final map. For example, a central room is usually a very open space with an interesting shape, so it will be edited to reflect that.
Finally I know the entrance is on the top and I’m undecided if there should be another entrance/exit
Setup locks and graph it!
First. What is a lock? A lock is not only a closed door that can be picked. Going back to Zelda a lock takes the form of an inaccessible tall platform, a frozen door that requires fire arrows, an elevetor that needs to be turned on. All of these are locks and most of them bring more flexibility and engagement than a door.
It’s not that locked doors are bad, it’s that in TTRPGs they are delays rather than obstacles, since, often, they can be picked. Of course there’s a time and a place to use locked doors, for example, they lend well to linear dungeons; and they are the most reasonable option for city buildings.
Another type of lock is a One-way lock. It’s open on the way in, but closes behind the characters. This can even take the form of a pit from where the characters fall and then need to find a way out.
 Dungeon with markers of where locks are located
When choosing where to place locks I try to get a feeling for how the characters will go trough the dungeon. For example, if you need to pass a one-way lock to get to the slanted H then whatever is used to open the one-way lock has to be found in or after the H.
The Graphs
The only way of familiarizing with the graphs is familiarizing with the graphs, so we’ll jump right in.
For this dungeon I came up with the following ideal path. Keep in mind this is just the flow of the dungeon. Details, how traps will work, treasure or even what kind of locks and keys are found here I’ll leave for later but I’m taking notes as I go. Right now I’m focusing making the dungeon worth exploring.
The abstracted dungeon flow
Graph overlaid on the dungeon
These are the steps I expect the characters to take.
- After entering the dungeon the PCs find:
- locked
purple B - locked
blue T - open
orange one-way lockcharacters are expected to enter here.
- locked
- Crossing
orange one-way lockthey find:- trap room. I think the trap will be related with the doors here, but I’m not sure how yet
- open door
- locked
magenta Y - locked
yellow z
- Behind the open door there’s:
blue Z key-
yellow Z keyso the characters can go out and openyellow Z lock. They can’t go back and open theblue Tbecause of theone-way lock
- Opening
yellow Z:orange X key-
mangenta Y key. Now PCs can openmagenta Yandone-way lock. However, I think, if they go trough theone-way lockand back in the trap will re-arm itself.
- Opening
magenta Y lock:- treasure hoard
- disarming mechanism to
one-way lock purple B key
- Locks
purple Bandblue T- If the characters open
blue Tbefore the boss room they find another treasure hoard, maybe a weapons rack, and an exit. So they could bail right now. - Thematically
purple B lockandpurple B keyshould be significant, they should be a Boss Door and a Boss Key.
- If the characters open
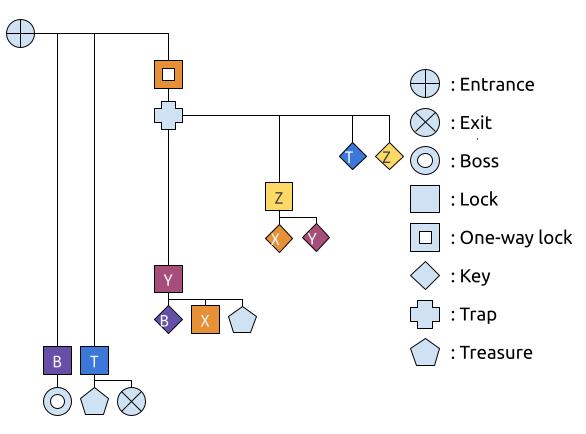
Using the graphs
There’s a reason the graph has vertical lines, horizontal levels and many different icons.
Icons represent very specific points of interaction between the dungeon features and the characters; that’s pulling, picking, pushing, etc. A corridor or an empty room does not require interaction, so they are not represented by icons.
Vertical lines mean things that need to be made in sequence one after the other. Lines without icons in the middle mean things that the characters can find at the same stage, but not necessarily interact with it. For example, after you enter the dungeon you’ll see both blue T lock and orange one-way lock but you’ll have to go and deal with other things before opening blue T.
Many parallel vertical lines mean there’s a lot of backtracking in the dungeon.
Height level indicates the order in which something can be interacted with. The higher something is the earlier you can interact with. That’s why keys are always higher in the graph than their respective locks. This also means if two things are at the same height they can be done in any order respective of each other.
Full dungeon graph
Vertical lines and height combined mean that the higher and the further right something is the easier it is to “solve” it. You can, almost, walk straight to yellow Z key but getting to the secondary exit will take some time.
Linear dungeons tend to have taller graphs. Dungeons with many optional content tend to have wider graphs. These parameters are not always related with architectural complexity. A clear example would be a garden maze: it only has a Entrance and Exit, and no other features to interact with, so it’s graph would be two icons on a straight line.
Making this kind of diagram gives you a very clear idea of the complexity of the dungeon, it will also show the importance of rooms by focusing the backtracking points, ig, the points the lines branch out.
Most Zelda dungeons have a central room that you’ll go back at least a few times, this gives players a good feeling of how a dungeon is laid out and reinforces the room’s importance.
Make it nice
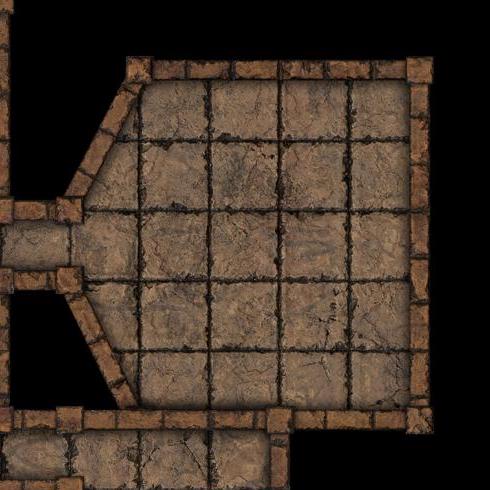
Right now we have both a map and a way to turn it into a dungeon. However some of the map’s rooms don’t quite work, it’s time for edits. I use Dungeon Scrawl, it’s a bit intimidating but I think the results speak for themselves.
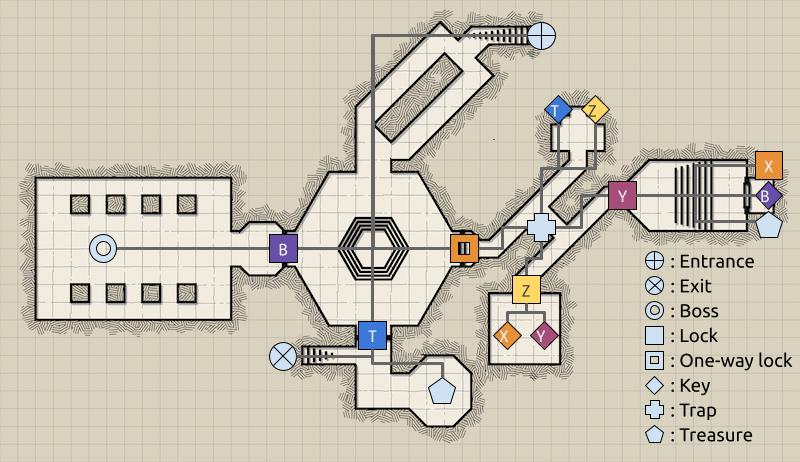
 Map’s final version. I prefer to think of it as an in-universe map. Not a tactical map
As far as edits go I personally prefer wider than taller maps. I also reorient many rooms and change the shape of important ones. In this case the central room is hexagonal and the boss room is directly facing that central room.
I don’t really add furniture or other such things, these kind of maps don’t make up for good tactical use. They are Zelda dungeon maps, the ones that display on the corner. They are meant to help characters navigate the dungeon. In combat most rooms can be run with theatre of the mind or an specific tactical map made for that purpose.
This being the case the map doesn’t even has to be “accurate”. Maybe that is a false wall and there’s a secret room, maybe that corridor has collapsed and the map is outdated. There are many possibilities when we use maps as pure abstractions.
If you are interested in this idea I made a whole different blog post with advice on running a dungeon in this style.
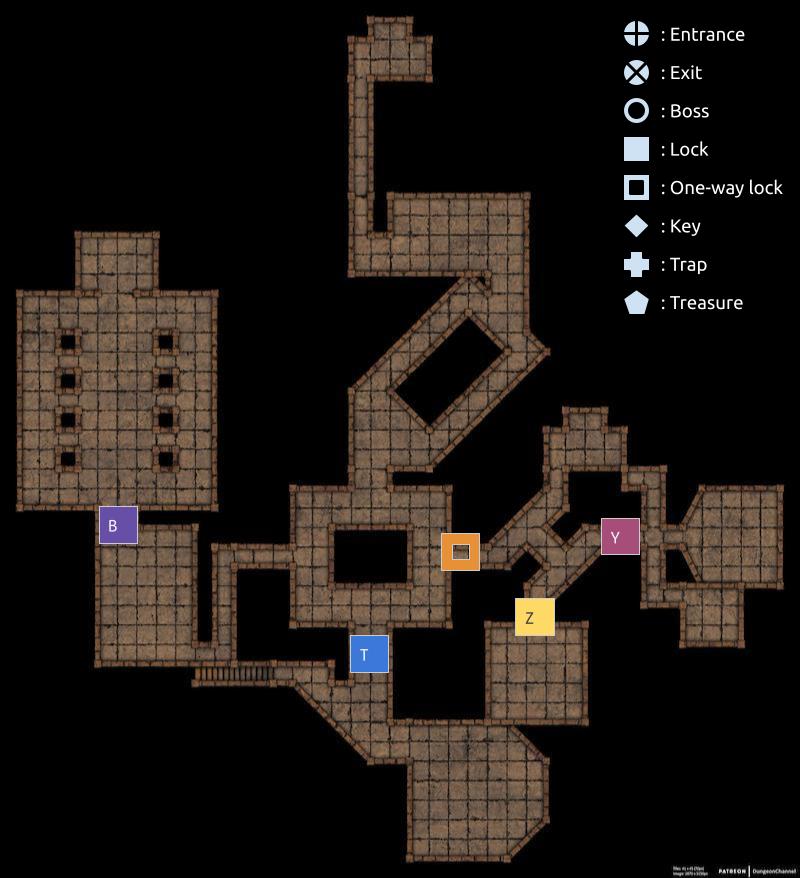
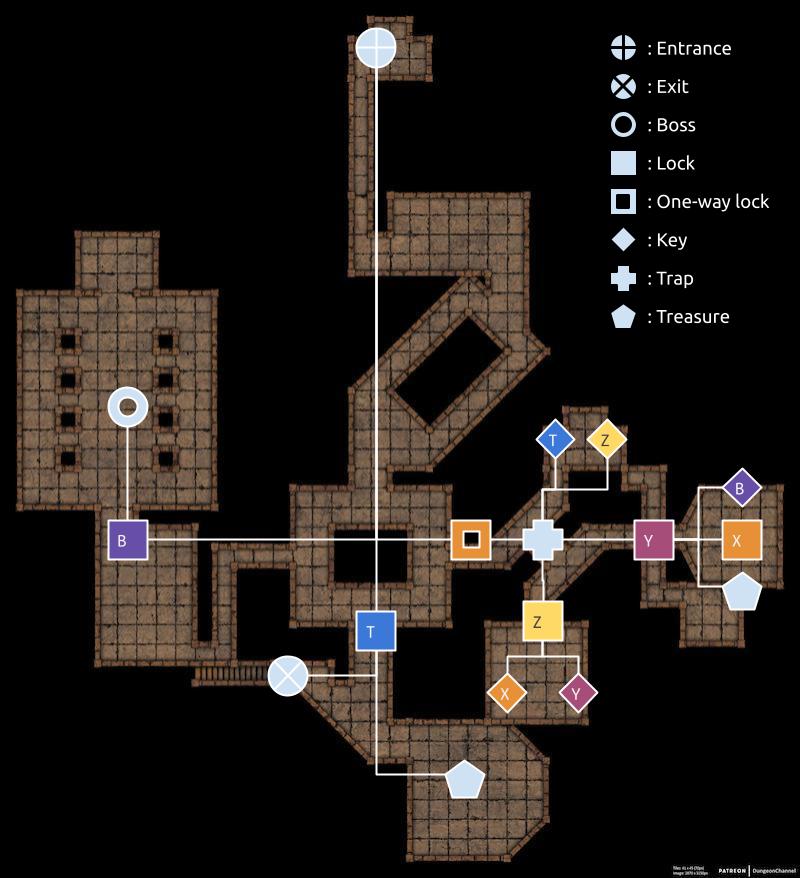
Before we go here’s the full graph notation and the final version of the annotated map. Always a good idea to keep it on hand.
 The final annotated version of the map
-
 Entrance: the characters enter the dungeon trough here. This area should immediately present the “theme” of the dungeon.
 -
 Exit: an alternative entrance/exit. This is useful in case the characters get trapped (which is always an option) or if they want to bail with what they have and avoid the boss.
 -
 Boss: the boss should always be able to leave this room if it makes sense. A dragon might not but a bandit commander for sure.
 -
 Lock: when graphing think of it as the limit of an inaccessible area. Of course, in play, this can always change, and it often will if the players have the skills.
 -
 one-way lock: use this kind of lock whenever you want to restrict backtracking. Ideally it locks when characters are too far to do anything about it.
 -
 Key: literal keys, levers, items, pressure plates. All the things that open the next section in the dungeon.
 -
 Trap: traps are varied beyond the scope of this very long post, but consider if they are lethal, troublesome or delays. I recommend checking Master The Dungeon’s YouTube channel for some cool traps (and their take on the Zelda Dungeon as well)
 -
 Treasure: not all treasure belongs in the map, but hoards or particular items are worth taking note.
If you liked this post and want to support me check out Arcane Moon, a D&D adventure inspired by 90s Magical Girl anime, published at DMs Guild. Or download for free my Fiasco Classic Adventure Busca Un Problema at Itch.io!
You can also read The Dwendalian War Inciting Incident the encounter that started the war in my Wildemount campaign. And you should read the other part of this same article on Advice to running a dungeon.
Finally you can follow me @darkade! Thanks for reading!
– Anya Reyes